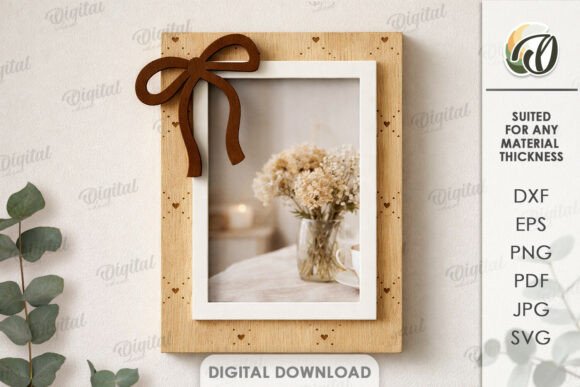
Mastering the Coquette Photo Frame Laser Cut: A Guide to Digital Precision
The coquette aesthetic has taken the design world by storm, blending vintage romance with modern playfulness through bows, ribbons, and soft curves. At the heart of this trend is the Coquette Photo Frame Laser Cut, a design that allows crafters to create stunning, personalized displays for homes, offices, and gifts. However, because this specific product is a digital download rather than a physical item, many buyers find themselves confused about what they are actually purchasing. Understanding the distinction between the digital file and the finished physical object is the first step toward a successful project.
When you purchase a Coquette Photo Frame Laser Cut file, you are acquiring a set of vector and raster instructions—typically in SVG, DXF, EPS, PDF, JPEG, and PNG formats—contained within a zip folder. These files are intended to guide your laser cutter, CNC machine, or even your paper cutting tool. The photos you see in the listing are strictly for inspiration; they showcase what is possible when the design is executed correctly with high-quality materials. No physical goods will be sent to your door. This digital nature offers endless possibilities for customization, but it also places the responsibility of material selection and machine calibration squarely on your shoulders.
Avoiding the Physical vs. Digital Misunderstanding
The most common mistake beginners make is assuming the purchase includes a ready-to-hang frame. This misunderstanding often leads to frustration immediately after checkout. Unlike buying a framed print from a big-box store, acquiring a Coquette Photo Frame Laser Cut design means you are buying the blueprint, not the building. If you do not have access to a laser cutter or a compatible cutting machine, you will need to source a local maker space, a fabrication service, or a friend with the right equipment to bring the design to life.
To avoid this pitfall, always check your capabilities before purchasing. If you are a small business owner looking to sell these frames, ensure your machine can handle the complexity of the bow details and the intricate inner cutouts typical of the coquette style. For hobbyists, consider whether the cost of materials and machine time aligns with your budget. The digital file is a great solution for creating an original design, but it requires a partner machine to become reality.
Selecting the Right File Format for Your Machine
Once you have downloaded your zip folder, you will notice multiple file formats. A frequent error is choosing the wrong format for your specific hardware, which can result in failed cuts, lost details, or excessive cleanup time. Not all laser software interprets files equally. For instance, using a raster image like a JPEG or PNG for a vector cutting job will force the machine to burn the outline rather than cut through it cleanly, ruining the delicate ribbon shapes essential to the coquette look.
Best practices for file selection:
- SVG and DXF: These are the gold standards for laser cutting machines like Glowforge, xTool, or industrial CO2 lasers. They preserve the vector paths needed for precise cutting.
- EPS: Ideal for users working in Adobe Illustrator or CorelDraw who need to scale the design without losing quality before sending it to the cutter.
- PDF: Useful for printing templates if you plan to trace the design manually or use it as a reference for hand-cutting, though less common for direct laser input.
- JPEG and PNG: Keep these for your marketing materials, social media previews, or client mockups, but do not attempt to cut directly from them unless your software specifically converts them to vectors reliably.
By matching the file type to your workflow, you ensure that the intricate loops of the bows and the structural integrity of the frame remain intact. A mismatched file can lead to jagged edges or broken connections in the design, forcing you to scrap expensive materials like acrylic or hardwood.
Material Choices and Design Integrity
Even with the perfect file, the choice of material can make or break your Coquette Photo Frame. A significant oversight occurs when creators select materials that are too thick or too brittle for the level of detail in the design. The coquette style relies heavily on fine lines to mimic the look of tied ribbons. If you choose a 6mm plywood when the design is optimized for 3mm, the laser may struggle to navigate tight corners, leading to charring or incomplete cuts.
Conversely, using a material that is too flimsy might result in a frame that cannot support the weight of a photo or stand upright on a desk. Before running a full batch, always perform a test cut on a scrap piece of your chosen material. Adjust your power and speed settings accordingly. For a professional finish, consider how the material grain interacts with the bow motifs; a chaotic wood grain might distract from the elegant curves, whereas a smooth acrylic or painted MDF can highlight the silhouette beautifully.
Scaling and Proportion Errors
Another area where efficiency is often lost is in scaling. Because digital files are infinitely scalable, it is tempting to resize the frame to fit a specific photo dimension without considering the proportional impact on the decorative elements. If you shrink the frame too much, the delicate bow details may become so small that they fuse together during cutting or break easily during weeding (the process of removing excess material). If you enlarge it too much without adjusting the stroke width or kerf settings, the frame might look disproportionate and clumsy.
A better approach is to maintain the aspect ratio of the original design whenever possible. If you must change the size, do so incrementally and inspect the preview in your laser software to ensure that the smallest details remain distinct. Remember, the goal is to create an original design for your home or office that looks intentional, not distorted.
Maximizing the Value of Your Purchase
For entrepreneurs and freelancers, the value of a Coquette Photo Frame Laser Cut lies in its versatility. One design can yield products for weddings, nurseries, Valentine's Day promotions, or boutique home decor. However, to truly capitalize on this, you must respect the licensing terms usually associated with digital downloads. Ensure you understand whether the file is for personal use only or if it includes a commercial license for selling physical finished goods.
Furthermore, don't limit yourself to a single application. While "photo frame" is in the name, these designs can be adapted into ornaments, wall art, or even stencils for painting. The possibilities of creation are endless, provided you approach the project with a mindset of experimentation and precision.
Before finalizing any project, take a moment to review your setup. Check your focus, clean your lens, and verify your material settings. If you have questions about the specific nodes in the SVG or how the layers are organized, reach out to the seller. Most creators are happy to provide clarification to ensure your success. Happy shopping, and may your cuts be clean and your designs beautiful.