Mastering Multilayer USA Map Clock Cut Files for Professional Laser Projects
There is a distinct satisfaction in watching a flat sheet of material transform into a dimensional piece of art, especially when that art serves a functional purpose in a home or office. The Multilayer USA Map Clock Cut Files represent a perfect intersection of geography, timekeeping, and modern fabrication. Whether you are a hobbyist with a new desktop laser cutter or a small business owner looking to expand your product line with patriotic decor, these digital templates offer a robust starting point. However, the difference between a wobbly, misaligned clock and a stunning wall feature often lies not in the machine, but in how you prepare and execute the file.
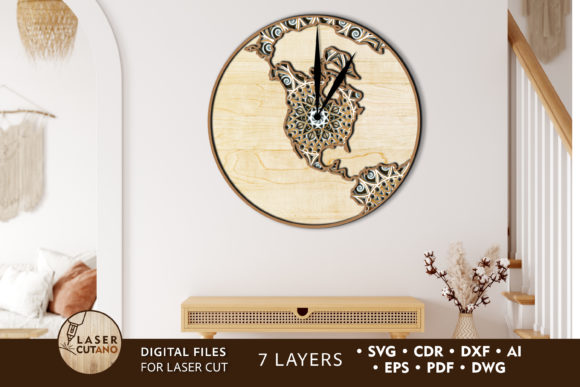
These designs, typically available in formats like .SVG, .DXF, .CDR, .AI, and .PNG, are engineered specifically for layering. A standard high-quality template, such as the popular 7-layer layout, relies on precise stacking to create depth. When executed correctly, the result is a 20 x 20 inch masterpiece that commands attention. Yet, many creators rush into cutting without fully understanding the nuances of multilayer assembly, leading to wasted material and frustration. Let's walk through the common pitfalls and the practical steps to ensure your final product looks professional.
Understanding the Complexity of Multilayer Designs
At first glance, a laser cut clock template might seem like a simple collection of shapes. In reality, a multilayer USA map design is a complex puzzle where every piece supports the next. The appeal of these files is their versatility; they work beautifully with plywood, MDF, acrylic, plexiglas, and even metal. However, the "one size fits all" approach does not apply to material thickness.
A frequent mistake beginners make is ignoring the recommended material thickness. Most of these 7-layer layouts are optimized for wood between 3mm and 6mm (approximately 1/8 inch to 1/4 inch). If you attempt to use 1/8 inch birch plywood when the file expects 1/4 inch, your layers will not stack flush. The clock mechanism shaft may be too short to secure the hands, or worse, the layers may shift over time, ruining the alignment of the map states. Conversely, using material that is too thick can prevent the clock kit from fitting through the center hole entirely.
Before you send your file to the machine, always measure your actual material stock with calipers. Do not rely solely on the label at the hardware store, as "1/4 inch" plywood can vary significantly. If your material differs from the file's default settings, you may need to scale the vector paths slightly or adjust the offset in your design software to ensure a snug, glue-ready fit.
Preparation Errors That Compromise Quality
One of the most overlooked aspects of working with MAP USA WATCH templates is the order of operations regarding finishing. It is tempting to cut all seven layers, stack them up, and then apply a stain or paint to the whole assembly. This is a recipe for disaster. Once glued, the nooks and crannies between the states and the background become nearly impossible to reach, leading to uneven color distribution and visible glue smears that refuse to take stain.
The professional approach is to paint or stain each layer individually before gluing. This allows you to sand down rough edges and apply a consistent finish to every surface, including the sides of the letters and state borders that will be visible in the final depth. For a striking look, consider painting the background layers a dark charcoal or navy while leaving the top state outlines in natural wood tone. This contrast highlights the multilayer effect far better than a monochromatic scheme.
Additionally, pay close attention to the file formats you download. These products usually come in a .zip folder containing .AI, .SVG, .DXF, .DWG, .CDR, .EPS, and .PDF versions. Never attempt to cut directly from a raster image like a .PNG unless you are using it purely for reference. Raster files lack the vector paths required for clean cuts. Always unzip the folder immediately after purchase and select the format compatible with your specific software (e.g., LightBurn, Illustrator, CorelDraw). Using the wrong file type can result in jagged edges or the machine interpreting your design as an image to be engraved rather than cut.
Scaling and Structural Integrity
Flexibility is a selling point of digital cut files, but it comes with caveats. You can certainly increase the size of the design to create a grand statement piece for a large living room. However, reducing the size requires extreme caution. The USA map contains intricate details, particularly in the New England area and the borders of smaller states.
If you shrink the design too much, these thin elements may become fragile or impossible to weed (remove from the surrounding material) without breaking. In laser cutting, if a bridge is too thin, it might burn through completely, causing a state to fall out of the frame prematurely. If you must reduce the scale, do so incrementally and check the minimum line width in your software. A good rule of thumb is to ensure no critical structural element is thinner than your material thickness.
Furthermore, consider the weight distribution when scaling up. A 20 x 20 inch clock made of seven layers of hardwood plywood can become surprisingly heavy. Ensure your hanging hardware and the wall anchor you choose are rated for the increased load. For larger versions, adding a backing board made of thicker MDF can provide necessary rigidity to prevent the clock from warping over time due to humidity changes.
Assembly Tips for a Flawless Finish
When you are ready to assemble your laser wall clock, dry-fit the layers first. Place all seven pieces together without adhesive to verify the alignment of the clock center hole and the overall symmetry. This is your last chance to catch any warping in the wood or cutting errors before they are permanent.
Use a high-quality wood glue or a strong adhesive suitable for your chosen material. Apply sparingly; excess glue that squeezes out between layers can ruin your paint job and create unsightly bumps. A toothpick or a fine nozzle applicator works best for controlling the flow. Clamp the layers gently but firmly while the glue dries to ensure a tight bond without crushing the delicate details of the map.
Finally, install the clock mechanism only after the glue has fully cured. Rushing this step can displace the layers while the adhesive is still setting. Choose a quiet, high-torque movement to handle the potential weight of the layered hands and the offset center if your design dictates it.
Making the Right Choice for Your Project
Investing in a premium Multilayer USA Map Clock Cut Files package is about more than just buying a pattern; it is about acquiring a roadmap for a successful project. By respecting material constraints, preparing your finishes early, and understanding the limitations of scaling, you elevate your work from a DIY experiment to a professional-grade product. Whether you are creating a gift, decorating your own space, or building inventory for your shop, attention to these details ensures that the time you invest yields a timeless result.
Remember, the files are tools, but your craftsmanship brings them to life. Take the time to plan your cut, respect the layers, and enjoy the process of building something tangible and beautiful.